Creating One to Many (1-to-N) Relationships
You are recommended to read "Understanding Relationships" before this section
if you haven't already.
Recommended video: Creating Relationships
How to Create a One to Many Relationship
- Click "Design" from main menu, select "Relationships".
- The relationship management window will open. Click "New Relationship" button.
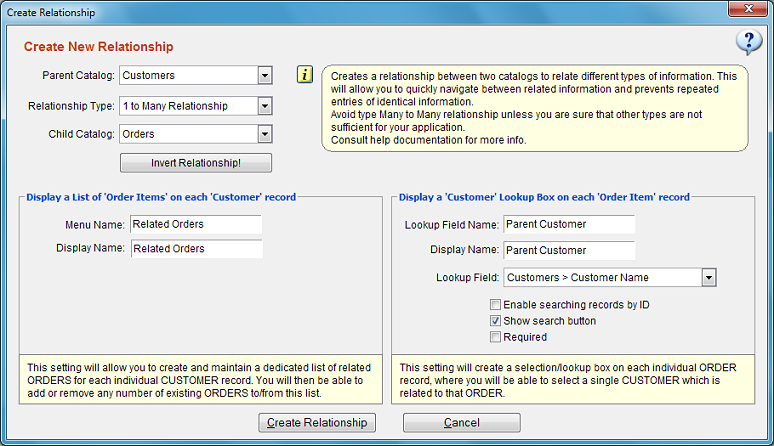
- Select the parent catalog (a.k.a master table) you wish to create a new relationship for.
- Select the relationship type as "One to Many Relationship".
- Select the child catalog (a.k.a detail table).
- Select a lookup field for the parent catalog.
Review the displayed information carefully to make sure that the suggested relationship properties reflect what you want to do.
If you want to do the opposite, just click the button "Invert Relationship". This will interchange the catalogs to create the opposite.
You may change the suggested menu and lookup field titles however, you are recommended to leave the recommended
naming convention as it is if you are a new user. You will be able to change the display name any time you want.
Example: If you are creating a relationship for "Customer" and "Order" catalogs respectively,
this will display the history of all orders on each customer record.
What is a lookup field? The lookup field helps you to select a parent record for the child record.
Example: If you are creating a relationship to save order history for each customer, the lookup field is displayed on Order records.
This field will display data from one of the fields from Customer catalog. You are recommended to choose a lookup field,
which can help you most to identify the record you wish to relate. So in this example "Customer Name" would be a good choice.
Displaying Menu Button and Lookup Field on Record Window
When you create a 1-to-N relationship, a menu button is automatically added to the record window of
the parent catalog. Clicking it will display the related records from the child catalog.
You will also be able to either create new or add an existing record to the related record list.
When you create a 1-to-N relationship, a relational lookup field is also created for the child catalog.
Beware that however the lookup field will NOT automatically appear on record details window!
You must add it into the record form from Form Designer window.
In the example above the menu button Related Orders will appear on each Customer record whereas
the customer lookup field Parent Customer can be placed on the record window of Order catalog.
Modifying a Relationship
Once created, changing the relationship type (1-to-N or N to N) or changing any of the catalogs is not allowed.
If you need to change these, you should consider deleting the existing relationship first which will also
remove all the related data information from records.
You may at any time rename menu titles as well as lookup field titles.
Deleting Relationships
Deleting a relationship deletes both the relationship menu button on parent catalog as well as the relational lookup field on the child catalog.
- No actual records are deleted from your database, however, the "related data" information for all records in both catalogs will be lost.
- On the parent catalog side, you will no longer be able to view related (a.k.a. child) records of a record.
- On the child catalog side, the lookup field showing a link to the parent catalog is removed from the record.
- If you have created computed fields which were configured to display or process data from the related records in either catalog, they will
stop functioning and become obsolote fields. You should remove those computed fields.
Displaying Child Records of Child Records
Assume that you have a Customer catalog with a 1-to-N relationship to the Invoice catalog.
Also, assume that the Invoice catalog has a 1-to-N relationship to the Order Items catalog.
In this configuration, each customer record will display related invoice records via a menu button and
each invoice record will display related order items of that invoice via its menu button.
(Another similar example with three catalogs could be: Clients > Support Requests > Activities)
This brings up the following question:
While displaying a customer record, how can you access the list of all "order item" records that belong to any of the invoices of that parent customer?
SpeedBase provides a solution to view "child records of all child records".
The steps below use the catalog names given in the example above. You can apply the same steps to any set of three catalogs which
have the same relationship structure.
- Open any record from the top parent catalog, ie. Customer catalog, click "config" button, select "menu items",
- On "menu configuration" window, select the "grandchild" catalog, ie. Order Items catalog, click "Add" button.
When asked, click "do not create relationship" button.
- Select the new menu item (order items) you've just added from the box on right, click "Views" button.
- View Management window will open, click "New View" button, add the desired fields and then save the view.
- Select the the view you've just added, click "Filter Settings" button.
- To create the filter, select "Parent Invoice" from the first selection box, then "Parent Customer" from the next selection box and then
"Current Item" from the next selection box. Note that the actual field names you must select depend on the names you used for the
relational lookup fields on each catalog.
- Save the filter and exit all configuration windows.
After completing the steps shown above, a new menu button to display order items specific to the current customer record will appear.